VTS Bone Graft Helps A Chihuahua Mend A Jaw Fracture at Sierra Veterinary Specialists
Sierra Veterinary Specialists
Periodontal Disease Case Study – Use of an alloplast material to treat a 309 furcation defect
Dr. David Clarke, BVSc, ADVC, fellow AVD, MANZCVS
Dental Care for Pets
Hallam, Victoria, Australia
Rudy is a 10 year old Havanese patient of Dr. John Lewis (NorthStar Vets, Robbinsville, NJ). His tumor, an odontogenic fibrosarcoma, was treated by resection and replacement with allograft. View Dr. Lewis’ video detailing the case history here. As of this writing, the 7 week follow up shows that “things are going great” for Rudy!
Another study detailing successful use of VTS’ cortical allograft struts has been recently published by Drs. Chris Snyder, Jason Bleedorn and Jason Soukup (Successful Treatment of Mandibular Nonunion with Cortical Allograft, Cancellous Autograft, and Locking Titanium Miniplates in a Dog, Journal of Veterinary Dentistry, 33(3):160-169, 2016.) See Case Study
Bone Graft for Periodontal Disease in a Miniature Poodle Dog
Dr. Brett Beckman
Atlanta, GA
This case courtesy of Dr. Rocco Mele, DVM assisted by Emily Schmidt, CVT, BS of Eastpoint Pet Clinic in Tucson, Arizona, photography by Cathy Mele
Dental specialists and general practice veterinarians alike are familiar with the difficult task of treating periodontal disease in canines and felines – whether it be through extractions, guided tissue regeneration, or a basic oral hygiene regimen. When full-mouth or multiple extractions are a surgeon’s only option, Veterinary Transplant Services’ injectable bone putty, Fusion Xpress, can assist with bone and soft tissue regrowth and help your patients heal stronger!
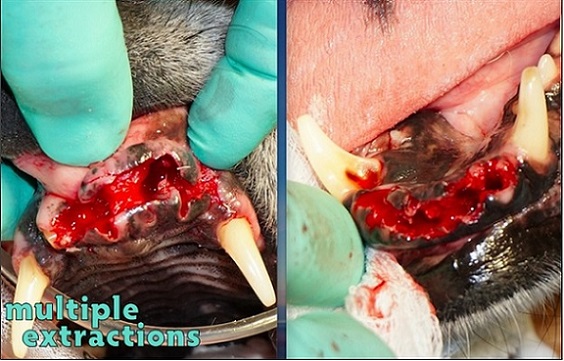
Sophie, a 13-year-old terrier mix, presented to Dr. Rocco Mele with grade 4 periodontal disease that necessitated extraction of several teeth.
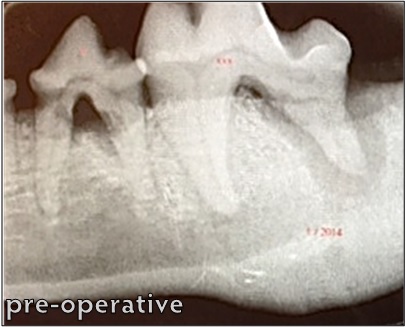
Bone loss surrounding the roots of Sophie’s molars can be seen on radiography taken at her initial consultation. Her mandibular bone height is decreased, leaving these teeth unstable and her mandible prone to fracture.
Dr. Mele’s recommendation for Sophie, to prevent pathologic fracture of her mandible and further bone loss in her surrounding teeth was the surgical extraction of the diseased molar and premolar (which was also suffering bone loss, with both interior and exterior resoprtion taking place).
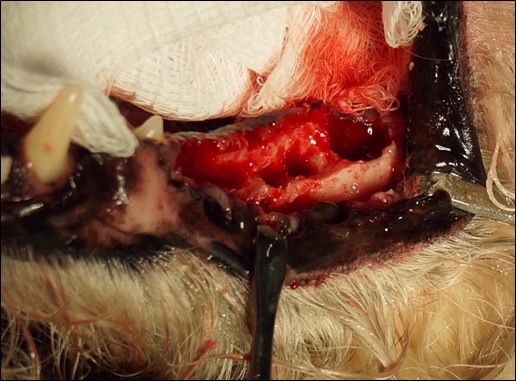
This photograph, taken intra-operatively following surgical extraction, shows the extent of the bone loss in Sophie’s mandible. Prior to the placement of Fusion Xpress, the site is fully debrided and irrigated to reduce potential for bacterial growth.
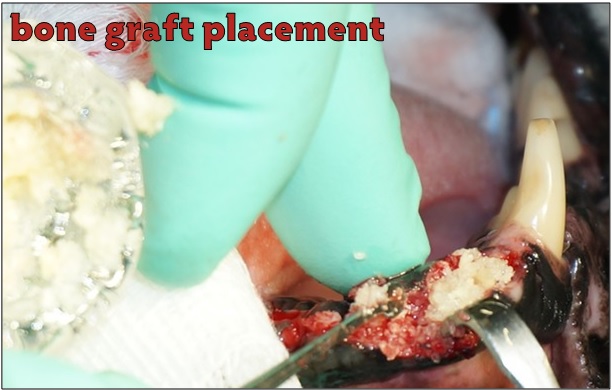
Fusion Xpress is the perfect solution for these hard-to-reach surgical sites. Made of a combination of equine bone and our synthetic bone substitute, Synergy, and packaged in individual doses in regular luer-tip syringes, Fusion Xpress can be expressed directly into a surgical site. Fusion Xpress‘ putty carrier makes it possible for the graft to stay in place while irrigating and regardless of the shape or size of the defect.
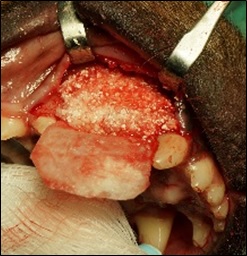
Fusion Xpress in place. This image, of another patient receiving periodontal surgery, illustrates the utility of the putty to mold to unique defects and stay in place even in bloody or irrigated sites.

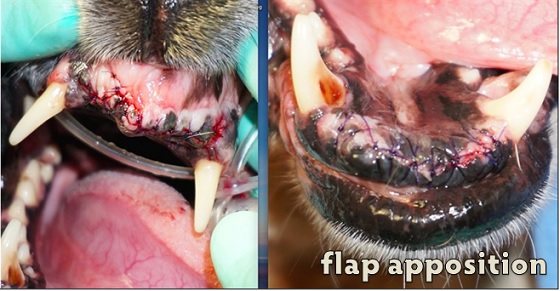
Following graft placement, flaps can be opposed and the site surgically closed. Closure can happen immediately after graft placement – no drying or setting time is required.
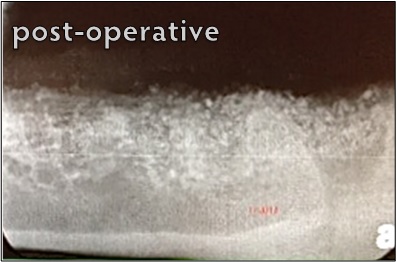
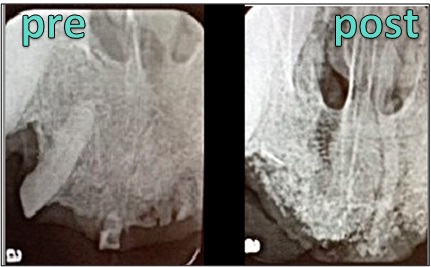
Both the particles of the equine bone and the synthetic are visible on the radiograph of the mandible immediately post-operative.
Sophie was seen for a recheck appointment 18 months following surgery.
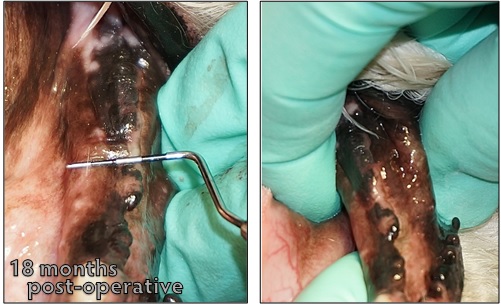
On physical exam, a probe held over the mandibular ridge shows a width of nearly 12mm. The robust bone growth is further illustrated when the surgeon grasps the mandible to isolate the mandibular ridge from the surrounding soft tissue.
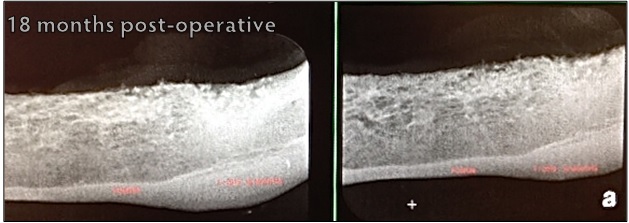
Two-view radiographs of the mandible reveal strong, radiopaque bone growth in the areas previously marred with bone loss secondary to Sophie’s periodontal disease. Both images were taken at the same visit.
Help your patients fight bone loss with Fusion Xpress – it’s easy to apply, offered in a variety of sizes and at a price that can fit any practice. Packaged in single-use doses, our putty is stored at room temperature and has a two-year shelf-life. Let VTS help you help your patients beat periodontal disease!
Case courtesy of Dr. Jan Bellows, DVM, AVDC, ABVP of All Pets Dental in Weston, FL.
Furcation defects are areas of bone loss, usually resulting from periodontal disease, in which the areas between a tooth’s roots are either exposed or inadequately protected. These defects are often treated through surgical extraction of the affected tooth. However, with the help of VTS’ graft products, surgical extractions aren’t the only option for veterinarians and pet owners.
Guided bone regeneration is a procedure that directs growth of bone to a site. In the case of a furcation defect, these procedures can help to strengthen the bone surrounding the defect. This was the case for a Golden Retriever who was referred to Dr. Jan Bellows. This pet’s owners wanted to do anything they could to save a tooth that another veterinarian wanted to extract. Dr. Bellows recommended she undergo a guided bone regeneration procedure. This patient had similar defects bilaterally. One side, unfortunately, had to be extracted. For the side pictured, Dr. Bellows used VTS’ Synergy and a cancellous mini block.

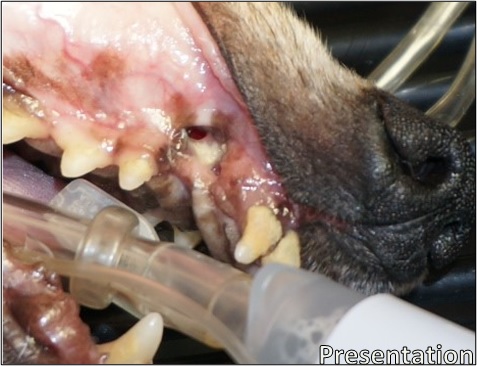
At the patient’s initial consult, the gingival tissue surrounding the tooth is visibly swollen and inflamed. Plaque and blood can be seen surrounding the defect. This tooth is also affected with an uncomplicated crown fracture.

At the time of referral, the defect had progressed to a stage 3 furcation defect.The soft tissue has recessed to the point that the defect is fully exposed; and a probe can be inserted in one side of the defect and come out the other.
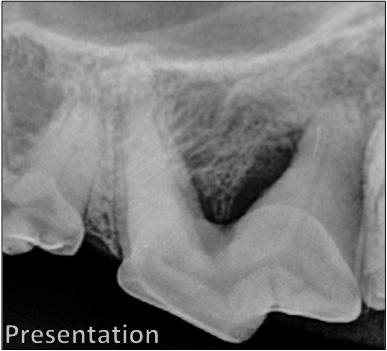
Bone loss is apparent in this pre-operative radiograph. Note the difference between the area of the defect, and the same area on another tooth on the left-hand side of the film.
Following the surgical extraction of the other tooth, the guided tissue and bone regeneration process begins on the tooth to be saved.
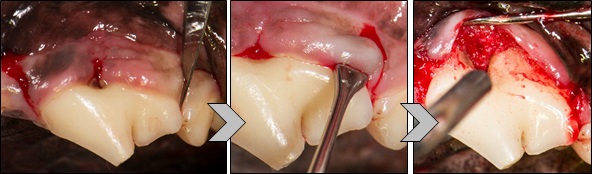
First, incisions are made on either side of the defect using a scalpel. The soft tissue is then separated from the tooth to fully expose the defect.

The defect is fully irrigated and cleaned to prepare for graft placement. With periodontal disease like this, it is common for food and bits of plaque to become lodged in the defect, causing further infection, irritation, and bone loss. Fully irrigating and debriding the defect removes the debris and prepares the root for regeneration of the periodontal ligament, which is expected with good root planing and bone grafting.
VTS’ cancellous mini blocks measure approximately 0.5 cm x 0.5 cm x 0.8 cm and are ideal for use in dentistry. Cancellous blocks are made from dense cancellous bone typically found in the condyles and plateaus of femur and tibia.
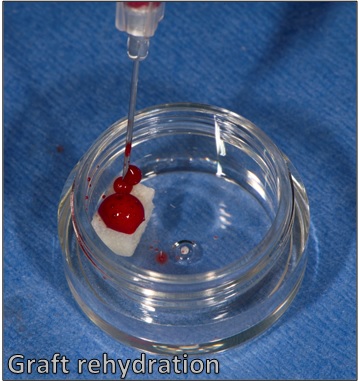
VTS’ cancellous mini blocks are shipped freeze-dried and must be rehydrated prior to use. Ideally, whole blood taken peripherally or from a bleeding surgical site can be used to rehydrate the graft. If the surgeon is unable to obtain whole blood, sterile saline may be used.
Once the graft has been rehydrated, it can be cut, shaved, or burred to the size and shape the surgeon prefers or works best for the patient. For this case, Dr. Bellows cut the block into a small slice that fit directly into the defect, and then smaller pieces to be packed on top.
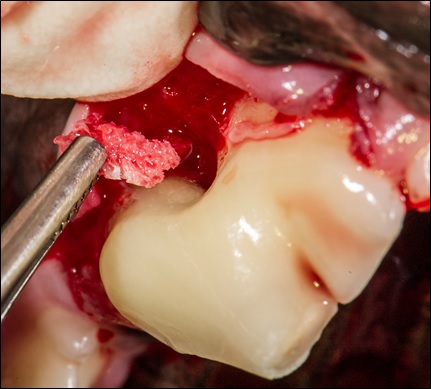
The cut and shaped mini block “slice” is placed into the defect site using surgical forceps.

The remaining block pieces packed over the defect.
Dr. Bellows then packed VTS’ synthetic bone graft, Synergy, rehydrated with blood, over the defect site, and into any void left by the soft tissue flap.
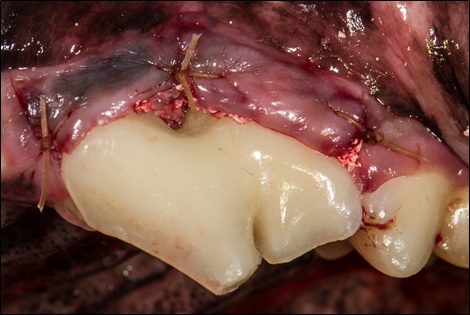
The flap is then closed over the surgical site.
Extraction isn’t always the only option for pets with furcation defects. Bone graft is the best substrate for remodeling and reformation of a patient’s lost bone stock. As advances in veterinary dentistry continue, VTS wants to help veterinarians save teeth!
This case courtesy of Dr. Rocco Mele, DVM of Eastpoint Pet Clinic in Tucson, Arizona
Oronasal fistulas (ONFs), a communication between the oral cavity and the nasal passages, are a common malady seen by both veterinary dental specialists and general practice veterinarians. Oronasal fistulas can be caused by trauma (such as a bite wound), or sometimes by extraction of large teeth; or by bone loss secondary to periodontal disease.
Riley was referred to Eastpoint Pet Clinic with an ONF (palatal and apical to tooth #104). This fistula occurred secondary to the surgical extraction of her maxillary canine tooth by a referring veterinarian several weeks earlier.
Oronasal fistulas can be painful and uncomfortable to pets. Bits of food can become lodged in the defect or enter the nasal passages, causing infection and discomfort. Riley was likely dealing with an infection when this photograph was taken; purulent discharge can be seen in and around the defect.
Large tooth extractions with oronasal fistulas like this one can result in significant bone defects in the maxilla, providing a passageway for food (and infection) to enter the nasal cavity, and poor Riley was no exception.
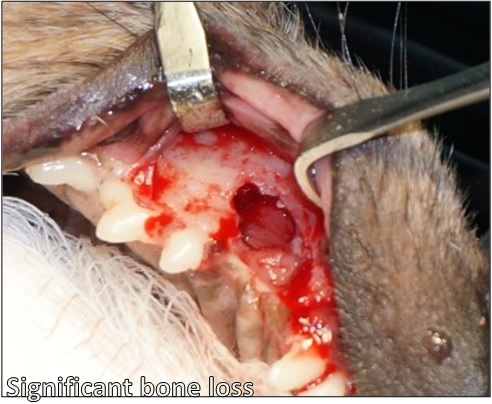
Riley’s oronasal fistula, with soft tissues fully retracted. Here, the mouth’s communication with the caudal nasal passages can be fully appreciated. With a bony void of this size, failure to fill the site with bone graft can result in soft tissue collapse, surgery site dehiscence, and necessitate further surgery.
The repair of oronasal fistulas is perfect for use of VTS’ Ossiflex, a thin, flexible bone membrane. Riley’s defect was repaired using an Ossiflex on the right side, which was trimmed to fit the defect after it was rehydrated with sterile saline.
The rehydrated membrane is placed over the defect and sutured in place. The membrane provides a rigid barrier that allows for bone growth to happen in a protected environment. The membrane closes the abnormal opening between the oral and nasal cavities. It will slowly ossify, providing support for Riley’s soft and hard tissue to regenerate.
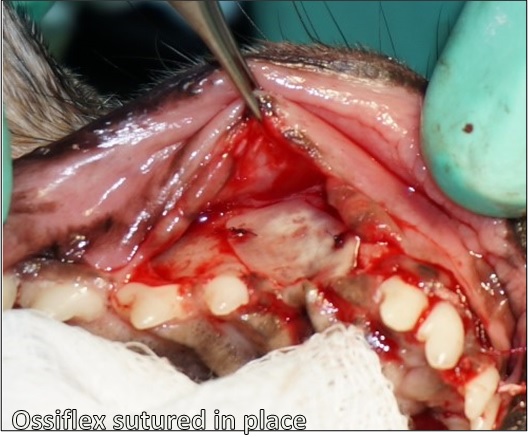
The trimmed Ossiflex is sutured in place using absorbable suture. Stabilization ensures the membrane will remain in place following flap apposition, as the surrounding tissue heals.
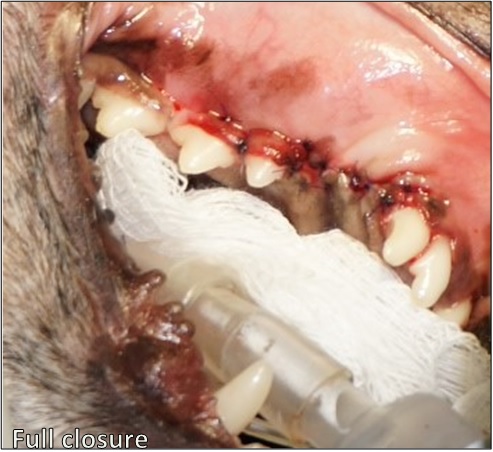
After the Ossiflex is secured and the defect is covered completely, the surrounding soft tissues can be replaced and sutured closed with a tension-free flap.
At seven months post-operative, Riley has healed beautifully. The soft tissue covering the defect site, per Dr. Mele, is solid and firm to the touch. Riley is able to eat, drink, and play as she did prior to developing the fistula with no risk of food entering her nasal passages.

Riley has been anesthetized for recheck radiographs at 7 months post-operative. The area where the defect was has completely healed, and the soft tissue appears healthy and strong, and maintains gingival margins similar to that of her surrounding teeth, preventing traumatic injury from her lower canines.
Radiographically, ONFs can be difficult to visualize. Below, Riley’s pre-operative and 7 month post-operative films illustrate tremendous bone growth. A “bridge” of new bone can be seen across the space previously occupied by her maxillary canine. As Riley continues to heal, that bridge will likely continue to grow, strengthening her maxillary bone structure.

Radiographs of pre-operative and 7 months post-operative. The circle highlights the bridge of new bone that has grown over the void left by the fistula and maxillary canine extraction.
Ossiflex is ready to cover your largest bony defects! Available in five sizes; thin enough to cut and suture, yet strong enough to resist food pressure and provide an immobile substrate for bone regeneration. Our flexible bone membrane is the answer for any patient with an ONF!
This entry courtesy of Dr. Rocco Mele, DVM of Eastpoint Pet Clinic in Tucson, Arizona
Dental trauma? Bone graft can help!
This is the end result of a deep underbite and haphazard chewing (bones, rocks, tennis balls, sticks, etc.) by a canine patient. The underbite, left untreated, resulted in trauma caused by the malalignment of the maxillary and mandibular incisors. This condition is highly problematic and the patient continually tries to alleviate the pain by further chewing, causing more trauma to the teeth and surrounding tissues – it becomes a vicious cycle. The treatment goal is to provide comfort, and by maintaining aveolar bone stock through the use of bone graft, the canine teeth can be preserved.
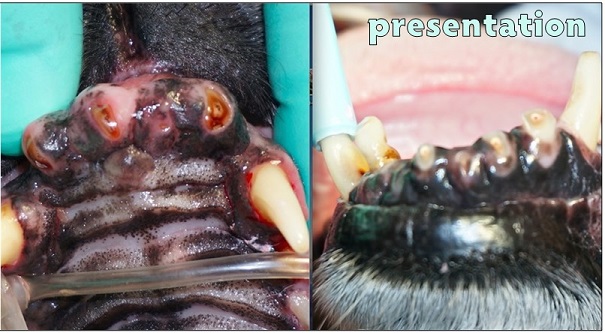
The patient’s maxillary incisors are completely worn down and the surrounding tissue is severely inflamed. The mandibular incisors are also almost completely worn down and pulp is exposed.
The treatment in this case was, first, to extract the teeth. This was extremely challenging, as most of the teeth were worn, impacted, and not easily manipulated with surgical instruments.
All incisors have been extracted completely. The bone loss in both the mandible and maxilla is clearly visible with the damaged teeth removed.
Following extraction, xenograft (VTS’ Equine Orthomix) was mixed with Lidocaine and Epinephrine and packed into the site. The aveolar ridge was evenly flattened and the bone graft packed on top to augment the site.
Equine Orthomix is packed into the mandibular extraction site. VTS graft products can be infused with a variety of pharmaceuticals, including antibiotics. In this case, Lidocaine and Epinephrine were used.
When closed, convexity of the apposed flap can be seen.
Full, tension-free surgical closure of both the maxilla (L) and mandible (R) are achieved. Bone graft can create convexity without increasing tension on the surrounding tissues.
Radiographically, the bone loss surrounding the incisors is visible on the pre-operative films. On the films taken immediately post-operatively, the particulate graft can be seen providing a structure on which ridge height can begin to be maintained. Bone grafts can augment areas of bone loss, providing structure where, previously, any sort of scaffold was absent.
Radiographic images of the maxilla.

Radiographic images of the mandible.
You can help patients like this one live a comfortable, pain-free lifestyle by using grafts from Veterinary Transplant Services – every extraction, every time.
Maxillary canines can leave large bone voids when extracted. The loss of this tooth and surrounding bony structures can lead to maxillofacial changes, including “lip catch.” Once healed, mandibular canines can cause trauma to the tissue covering the extraction site or upper lip. The use of bone graft to fill the extraction site can prevent these changes in the maxilla.
The most effective way to fill such a large extraction site is to use a barrier (Ossiflex or Fascia) and particulate bone graft (Periomix).
1. To rebuild the convexity of the maxilla following a maxillary canine extraction, fill the empty alveolus with Periomix. The rebuilding of convexity helps the mandibular canine to fit without catching the lip or traumatizing the surrounding tissues or other physiological structures.
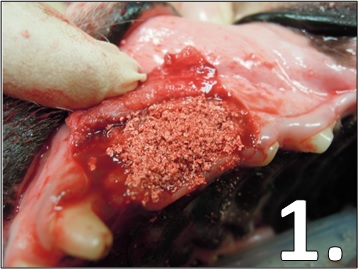
Periomix in a maxillary canine extraction site. Rehydrate the freeze-dried bone particles with a few drops of patient blood and pack into the site.
2. VTS’ flexible, natural bone membrane, Ossiflex, or pieces of Fascia can be placed on top of the Periomix to prevent the particulate granules from dispersing and facilitate bone healing under the protection of a barrier. This is known as Guided Bone Regeneration.
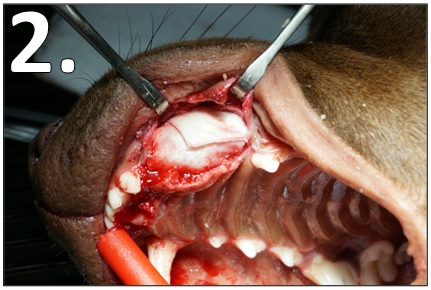
Fascia pieces cover the Periomix in a maxillary canine extraction site. Rehydrate the freeze-dried fascia or membrane with sterile saline before placing into the site.
3. Once the particulate and soft tissue or membrane are in place, close the flap created for the extraction. Then, proceed to full closure.
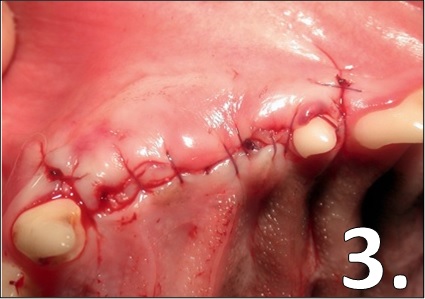
Maxillary canine extraction site at full closure. Note that the maxillary convexity created by the process of Guided Bone Regeneration is visible once closure is complete.
Images 1 and 3 courtesy of Dr. Tony Caiafa, DVM, DDS, DAVDC and Dr. Loïc Legendre, DVM, DAVDC, DEVDC. Image 2 courtesy of Dr. Rocco Mele, DVM. canlı bahis
Case courtesy of Dr. Rocco Mele, Eastpoint Pet Clinic, Tucson Arizona
“Amos”: 8 year 8 month male Toy Poodle.
“The owner of Amos is a Prosthodontist who knew that preserving teeth was possible. He wanted Amos to have the benefit of having all his teeth. Amos had Grade 3 mobility, and both the Maxillary and Mandibular incisal arches had significant bone loss. , , erotik film izle , rus escort , seks hikayeleri
This is a very common problem and I usually extract and augment, however the owner wanted to try to save Amos’ incisors before resorting to extraction. With his insistence and using principles of Guided Bone and Tissue Regeneration, I used VTS Fascia Allograft and Periomix with open debridement and root conditioning techniques. The fascia allograft handles well and conforms easily. Interrupted and loop sutures were placed around the incisors to support the fascia and gingival tissue. The fascia acted as a protective membrane for the Periomix allograft.
The case turned out well. I saw him at the 3-4 month follow up and both the Maxillary and Mandibular incisors, and the tissues, look fantastic. This clinical case demonstrates the technique used for GBR and GTR for a very tough and common problem! The owner is very happy with the results. Worked beautifully.”
Maxilla Mandible
 Pre Op Maxillary Recession
Grade 3 Mobility…
 Pre Op Mandibular Recession…
 Intra Op Debridement
The extent of bone loss is apparent.…
 Intra Op Debridement Mandible
More bone loss evident.…
 VTS Periomix® Bone Graft Image…
 Packing Periomix® Bone Graft Around Roots…
 Fascia Membrane Graft in Place Over Periomix® on Maxilla…
 Fascia Membrane Tucked in Place Over Periomix® on Mandible…
 Maxillary Sutures…
 Mandibular Sutures…
 5 Weeks Post Op
Beautiful outcome.…
 3-4 Months Post Op
Teeth Saved: “Incisors and tissues look fantastic.”…


Post: Why pull teeth when it is possible to save them?